
 How to Build a Shipping Container Home:
Action It.
Building a house is no small feet. Even a small one. There are thousands of materials, pieces, and tasks involved. Unless you are a builder or experienced it's intimidating. But, what containers as perfect modules allow you to do, is simplify the entire process. Think of a typical 1, 000 square foot house. Try and work through in your head the total length of timber for the framing, square footage of sheathing, number of floor joists required, and ceiling rafters. Can't do it. Not too many can. Now think about that 1, 000 square foot house made out of shipping containers. It's 3 forty foot containers. By reducing the house into 3 base component pieces (modules), it's much easier to understand, design, and build.
I. Permitting, Bidding, and Pre-order
Finish construction documents for your shipping container home and submit to building authority for permitting.
Submit construction documents to factory for pricing and engineering of container modules.
Clarifications to building authority and factory as required .
Get required permits from building authority.
Submittal of construction documents to general and sub contractors.
Execute purchase order of container modules from factory.
II. The Build
Site Work
- Begin grading work including any required excavation for foundation, utilities, storm water management, and septic.
- Bring required utilities to site.
- Install septic system and any storm water management system if required.
 Foundation
The foundation shown below is a typical slab on grade application for a 1000sf (three 40' containers) shipping container home design. There is a 24' x 40' perimeter foundation wall made from precast concrete panels, but could easily be cmu block or poured concrete. The perimeter was excavated and trench filled with gravel (for drainage). The precast panels were dropped in via a crane and tied together. The panels included insulation and exterior water proofing membranes added at the factory. Utilities (water, electircal, and gas supply lines) are run to the base of the foundation and then to there respective locations in plan. Foundation walls were then back-filled, soil compacted, gravel added, rebar laid out, and then slab poured.
The Shipping Container House Foundations link in the Reference section has information on other foundation options and design.
Container Modifications
Shipping containers have monocoque bodies. The corrugation panels (roof, sides, and back), floor, purlins, front doors, frame, and rails form an integrated structural skin. They are strong and made to carry floor loads far in excess of what is required for typical home construction. But, when you modify them, cutting holes or penetrating members, they are weakened. Regardless of what level of modification your shipping container home design calls for, it is recommended to review with a structural engineer or architect.
As we said above, when cutting a shipping container or removing any of the paneling, it's structural integrity is compromised. As an extreme example, consider the removal of all a container's corrugated paneling along the length of one side (see the images below). Without reinforcement, the container deforms and then fails structurally. As a general rule, whenever you remove portions of the panelized corrugation, steel framing will be required to frame out the opening. In addition, column and roof support will be necessary depending on the size of the opening(s) and roof/wind loads.
Steel cutting, framing, and welding is a large part of shipping container home design and construction. Typically, steel construction is not used much in single family or smaller home design because of expense. Cost of steel vs. wood/light guage framing is substantial and the labor cost for steel vs.carpentry is also higher. To combat this, it is best to have as much of the welding and reinforcing done off-site before setting the containers on site and starting the interior fit-out. Most (if not all) container re-sellers have the facilities to make these modifications. If you don't have experience in metal work, or are not hiring a general contractor, you should plan on doing most of the container modification work off-site prior to delivery. More information on Cor-Ten steel (the weathering steel shipping containers are made from) is available at the link in the RSCP Reference section.
The link has more detailed information on the structural components of a shipping container. The link has more information on container to container connection details and framing on opening in the corrugation.
Set and Secure Containers to Foundation and Each Other
When the shipping containers arrive on site, they are crane-lifted one by one onto the foundation, hooked into place, and welded down to marry them completely to the foundation. These heavy-gauge steel containers are so strong—each is designed to carry 57, 000 pounds—that they need only be fastened at the corners to hold fast, much as they would be on a ship. In the example above, the shipping container bottom corner blocks are welded to steel plates imbedded in the concrete slab to secure the house to the foundation. All corner blocks are welded to each other to secure the containers to themselves in the image below.
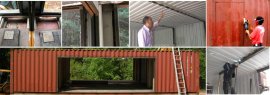
Install windows, exterior doors, flashing, and any sky lights. Windows are set into openings that were measured and cut prior to delivery of the shipping containers or roughed out on site. All openings for windows and doors should be framed with a steel section. Hollow rectangle sections work the best, but an L section will work as well. Images below show openings for sliding door systems in the end and sidewall panels of a container. The link has construction details for window/door framing, flashing, thermal breaks, and glazing.
Install interior framing, insulation, heating and cooling systems, plumbing, electrical, and rough out all fixtures. Supertherm insulative coating, is sprayed on both sides of the remaining container walls. Supertherm is a high-performance, four-part ceramic coating that carries an R value of R-19 and adheres to the steel surface of the shipping containers. A ½- inch plywood floor over the existing ¾- inch plywood sub-floor is installed. Metal hat channels for wiring are run along the walls and vertical support beams are secured. Metal studs and drywall are used for interior partition walls. Once insulated, the existing container walls are faced in drywall for finishing.
Install fixtures.
Finish grading and landscaping.
III. Inspection and Sign-off
Staged inspections through the build with contractor and building official - foundation, plumbing and electrical, architectural, and fire.
RELATED VIDEO


Share this Post
latest posts
-
 Shipping containers House March 11, 2026
 -
 Home mold Removal Services February 19, 2026
 -
 Local Tree Removal Service January 30, 2026
 -
 Paintless Dent Removal Services January 10, 2026
 -
 Trailer Removal Service December 21, 2025
 -
 Shipping Container Cabin Floor Plans December 1, 2025
 -
 Conex shipping containers November 11, 2025
 -
 Shipping containers for sale in Florida October 22, 2025
 -
 Shipping Container Ideas September 23, 2025