 Setting up Flat Rate Box Shipping requires some thought and planning on your part. Before you even get started with the plugin, you will need to do the following:
- Determine your shipping zones
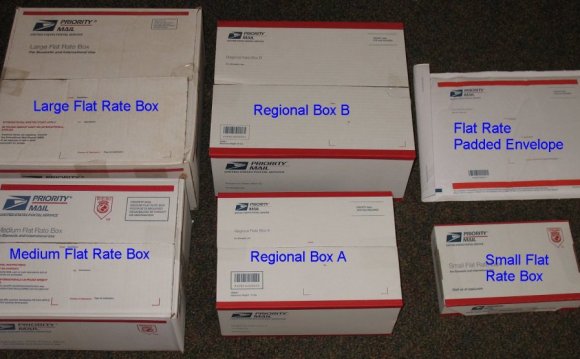
- Find out the dimensions of the box sizes you want to offer
- Ensure your products have dimensions set. See
Create Your Shipping Zones
Shipping Zones are different geographical regions that your products will be shipped to. These will be different depending on where you are in the world. If you’re based in the UK, for example, you may set up your zones as follows:
- Zone 1: UK and Northern Ireland
- Zone 2: EU Countries
- Zone 3: Rest of the World
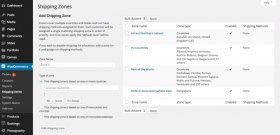
Once you have created your zones you can create flat rate box rates for each of them. To set up your zones:
- Navigate to WooCommerce > Shipping Zones
- Give your Shipping Zone a name
- Choose the Type of zone. You have the following options:
- One or more countries
- One or more states or countries
- One or more zip or post codes. This field accepts wildcards so that you can include a postcode region. For example, SW* would include the south-west London region, while NE* would include the Newcastle-upon-Tyne region. You can also ship to ranges. An example for zipcodes would be 451-459. Each individual range or wildcard needs to be on its own line.
- Click Add Shipping Zone
 Create as many shipping zones as you require. Your table of Shipping Zones will look something like this:
Create some Flat Rate Box Rates
Next, you need to create some rates for your boxes inside each zone.
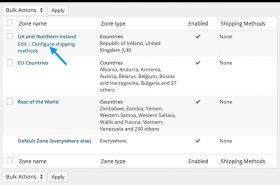
1. Add a Shipping Method
With your Shipping Zones open, select Configure shipping methods in the Shipping Zone you wish to add rates for.
Choose Flat Rate boxes and click Add to zone.
2. Configure your Settings
Each flat rate box shipping method has its own settings for you to configure.
- Method Title – Title of the shipping method, shown to the user on the frontend.
- Enable/Disable – Whether this method is actually enabled.
- Tax Status – Tax status for this shipping method (taxable or not).
- Handling Fee – A fee added to the shipping cost for this method. Can be fixed e.g. 10 or percentage e.g. 10%. Percentage is based on the cost of the items being shipped.
- Un-packable Item Cost – If an item won’t fit into any of your boxes, charge this amount. Leave blank if the shipping method should be disabled if an item cannot be packed.
- Boxes – See below.
3. Add boxes
Click Add Box to add a box to your shipping method. You can add as many as you want, and they will be used for packing (the most relevant box will be calculated for you).
Dimensions and weights of boxes will use the units you define in WooCommerce > Settings > Catalog.
Boxes can be given the following properties;
- Box Length – Length of the box. We recommend using the largest dimension.
- Box Width – Width of the box.
- Box Height – Height of the box. We recommend using the smallest dimension.
- Box Weight – Overall box weight limit.
- Box Cost – How much the box costs to ship. This is a flat value per box.
- Cost per – A cost multiplied by the weight. E.g. if you had a 10lb box and charged £1 per lb, the cost would be £10.
- Cost % – A cost added based on the value of the items packed in your box. E.g. if you had £10 of items, and a 10% cost, an extra £1 would be added to the shipping cost.
RELATED VIDEO


Share this Post
latest posts
-
 Shipping containers House March 11, 2026
 -
 Home mold Removal Services February 19, 2026
 -
 Local Tree Removal Service January 30, 2026
 -
 Paintless Dent Removal Services January 10, 2026
 -
 Trailer Removal Service December 21, 2025
 -
 Shipping Container Cabin Floor Plans December 1, 2025
 -
 Conex shipping containers November 11, 2025
 -
 Shipping containers for sale in Florida October 22, 2025
 -
 Shipping Container Ideas September 23, 2025